|
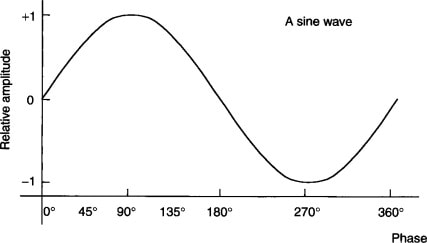
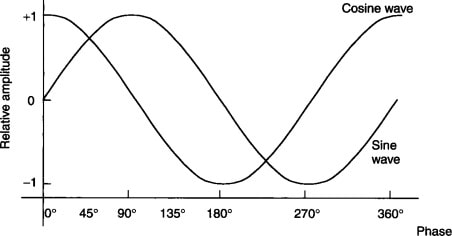
Back in the days, when Analog gears was the only option, linear phase wasn't possible, but today with modern technology we can use if needed a Linear Phase EQ, but what is it? For an easier understanding let's imagine to EQ a sine wave As you can see it start from zero then continue the full cicle. If you use an eq in linear phase mode, the shape will change accordingly with the curve you are using, but the cycle will be the same. Will still start from zero and end to zero. If you do the exact same eq but with a normal eq, you will have the same shape you had before, but with a different phase. To have an idea on what a different phase is, just thake a look at the following picture You can see here, the same sine we had before, and another one that seems to "start earlier". This is what a normal eq does, they just do not change the frequency response but also shift the phase. So you may think linear phase eq are a better choice. But this is not true... it depends. Linear Phase EQ are able to mantain the same phase, but with side effect, called "pre-ringing". On certain sounds, it's not a problem while in others it's a big issue. But what is pre-ringing? It's a kind of echo that occour before the audio. In the following image you can see on the right the original waveform, while on the left the waveform after a linear phase processing. We don't have just a different waveform because of the EQ, but we also introduce this echo right before the sound.
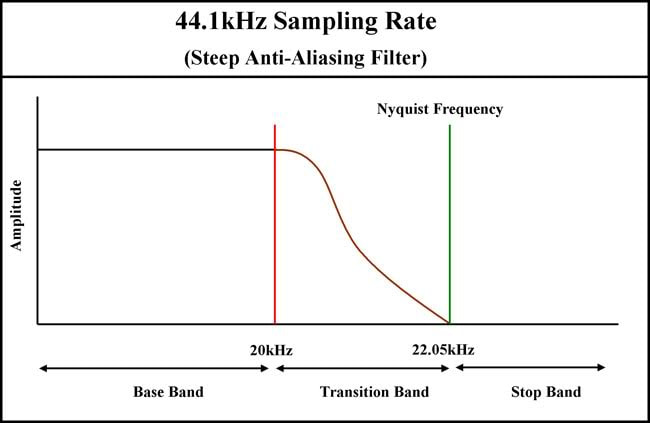
Generally speaking my suggestion is to use normal eq and reach for linear phase processing only when you do some parallel processing that may introduce audible phase cancellation. You may have read on different places the loudness target for streaming services is -14db LUFS -1dbtp. Let's start saying this is wrong for lots of reasons. This is why professionals doesn't master songs with these targets. I made a video where i just not explain why, but i also show what professionals does, and why you should not aim for these wrong targets. In the video i also made a crazy, but very interesting experiment. I made the loudest song in the world, then i released on Spotify. And things get very very interesting. When the mix is done, you want your song to be mastered. But how should you export your mix for the best result? (tl;dr at the end) Speaking about peak levels, theoretically your max peak could be -0.1 because what matter is to have a clean signal with no clipping, anyway it's suggested to go lower, and since there are no drawbacks to lower the volume have the max peak at -6db it's a good choice. Of course peak level is not the only setting you must care, but sound quality matters too. When you export your mix, it's suggested to use 32bit floating point if possible, otherwise 24bit is good enough, no worries. Anyway i really suggest you to avoid 16bit, cause there are too much informations that will be lost. What about Sample Rate? You may find suggestions, articles that say the higher the better, while that's technically correct, i made lots of tests in the past, and in the real world this doesn't really matter 44,1khz it's enough. While mixing, it's importhant thought, to use oversampling on every process that introduce harmonic distortion, so plugins such compressors, saturators and clippers need to work on higher internal sample rate (oversampling) to remove aliasing and getting back with a clean signal. Oversampling make obsolete the need to run the whole project at higher sample rate, last but not least your music at the end of the process will be converted at 44.1khz, because even on the streming services era it's a standard, and by the way 44.1khz means to have 22khz as higher frequency. Kids can ear up to 20khz, while adults around 15khz (it's a bit more complicated, but let's keep it simple) so 44.1khz sample rate already allow us to have available all the music content human can hear. I know nerds out there would say that it's still better to go higher sample rate because of Nyquist frequency. If you filter at higher frequency the response on the 20khz may be flatter (it depend on the Nyquist filter and how the transition band is designed). And while this is technically true, very likely you will still need to downsample to 44.1k later, to distribute your music to streaming services (most of them don't accept anything different from 44.1k) and even if we can go higher, and we render with a very bad program that have a poor Nyquist filter, we would likely lose 2db at 21khz to 0,5 at 19khz. Can you really hear these differences?
I made my accurate tests in the past, the only difference in the analyzer were around -110db at the worst case, not really something we can feel. Just a couple of suggestions: I strongly suggest you to avoid any limiter on the mix bus, this may harm the mastering process. Other kind of mixbus processing depends on your knowledge, if your song is mixed by a professional mixing engineer he know how and what to do, but if you are the one who mix your song, it's better ask to your mastering engineer what to keep and what to remove. And here we come to my last suggestion: When you hire an engineer, don't be afraid to make your questions, the more we talk, the better, don't worry, we don't eat artists and producers.... usually :) TL;DR Sample Rate: 44,1khz Bit Rate: 32bit Floating Point Max Peak: -6db For any doubts talk to your mastering engineer If you want your song to be mastered (or mixed) feel free to send me a mail at effettimusic[at]gmail.com Reverb is an essential tool in music production that can bring a sense of depth and space to a mix. While it's commonly used to make a mix sound natural, reverb can also be used in creative and unique ways to add interest and texture to a production. In this article, we'll explore some of the most innovative approaches to using reverb in music production.
Adding Depth with Reverb One of the primary functions of reverb is to add depth and dimension to a mix. This is especially important in electronic and dance music, where a lot of the sounds are synthetic and lack natural depth. By adding a small amount of reverb, you can create a sense of space and make your tracks sound more immersive. Creating a Sense of Space with Reverb Another way to use reverb creatively is to create a sense of space. This can be especially effective in genres like ambient, chillout, and downtempo, where a sense of atmosphere is crucial. By adding reverb with longer decay times and lower wet/dry ratios, you can create a sense of spaciousness that makes the listener feel like they're in a large room or hall. Creating Unique Effects with Reverb One of the most exciting aspects of reverb is the ability to create unique and interesting effects. This can be achieved through the use of automation and other creative processes. For example, you can automate the reverb's parameters so that it changes over time, adding movement and interest to a mix. You can also experiment with different reverb algorithms and settings, such as gated reverb or reverse reverb, to create truly unique effects. Conclusion Reverb is a versatile and powerful tool in music production that can be used in creative and innovative ways to enhance the sound of a mix. Whether you're adding depth, creating a sense of space, or creating unique effects, there are countless possibilities with reverb. By exploring different techniques and approaches, you can find the perfect reverb settings to complement your music and take your productions to the next level. Compression is an essential tool in music production, and it plays a significant role in shaping the sound of a mix. This article aims to explain what compression is, how it works, and how it can be used effectively in music production.
What is Compression? Compression is a process in which the dynamic range of an audio signal is reduced. The dynamic range of a sound refers to the difference between its loudest and quietest parts. In music production, this can be important to control the balance of different elements in a mix, and to make sure that everything can be heard clearly. Compression works by reducing the gain of an audio signal when it exceeds a certain threshold. This threshold is set by the producer, and it determines the level at which the compression takes effect. When the signal exceeds this level, the gain is reduced, which results in a more consistent sound. How Compression Works Compression works by using a combination of a gain control and a detector. The gain control reduces the level of the audio signal, while the detector monitors the level of the audio signal and triggers the gain control when it exceeds the threshold. There are two main parameters that can be adjusted when using compression: the threshold and the ratio. The threshold determines the level at which the compression takes effect, and the ratio determines how much the gain is reduced when the signal exceeds the threshold. For example, a ratio of 2:1 means that for every 2dB that the signal exceeds the threshold, the gain is reduced by 1dB. Different Types of Compression There are several different types of compression that can be used in music production, including:
Compression can be a powerful tool in music production, but it must be used carefully to achieve the desired result. Here are some tips for using compression effectively:
Conclusion Compression is a powerful tool in music production, and it plays a critical role in shaping the sound of a mix. By understanding the different types of compression, how they work, and how they can be used effectively, producers can create a sound that is well-balanced and full of impact. |
Archives
May 2023
Categories
All
|


